
Fairly sure the Mechanicum don’t have the same problems you and I are going to have building these things.
I wasn’t going to do this article, but to be fair, having scoured the internet for help when I began this project, there was absolutely nothing of any help bar this one post, which to be fair, helped me out so cheers to the guy who wrote it. You can find it here for reference. The project in question was to build and paint an Emperor’s Children Fellblade. Something no one bar Forge World have done, or at least, posted on-line about it it seems. There’s a few weird conversions using Baneblades, but to be fair, given the £160 price tag, I can see why people might swerve the kit. Having built one, I can also see why people might swerve it, as it was less a kit, more a prolonged exercise in problem solving. Hence this article, to help you along the way if you do decide to go down the route of a Forge World super heavy.
This is a guide on the issues I had assembling a Forge World Fellblade kit and what I’d do differently next time. Before I begin, I’ll just mention the stuff you’ll need and a few skills. The first being straightening out resin pieces. I use hot water for this, soften up the resin then bend it to the shape you want, or use a flat surface to flatten it right out, then hit it with cold water to harden it up. A few smaller bends this way, is better than one big bend, as it’s likely to snap. Steady does it. You can also use a hairdryer for this task. You’ll also need a pin vice or hobby drill as they’re now known, you can Dremel the bigger pieces if you like, but you should be fine with a hand drill, and some pins, panel pins, brass rod or even straight runs of staples are fine, just something that will give your joints strength.
Glue-wise, use epoxy resin for these big kits. Super glue is alright, but when youre dealing with the size of the pieces in kits like this, epoxy resin is the one. Its cheap enough, but is absolutely awful to work with. It positively stinks, and is highly likely toxic so use it in a well ventilated room, and don’t allow your pets anywhere near your work desk. You’ll also need the usual files, and likely a hobby saw, but in addition, I’d recommend a nail buffer as well. These things are amazing, and will file down any rough surfaces or blips to a smooth sheen ready to take your primer. For 59p in Bodycare, these things are indispensable. Also get some safety masks while you’re out, paper ones, or a more heavy duty one if you like. While the resin’s not going to kill you, it IS going to irritate your nose throat and lungs, so mask up and again, keep your pets well away. I’ll mention here too that you need to be filing down any rough edges before you dry fit, and any mould gates need to be removed with your saw or hobby knife, and again, the rough edges left need to be smoothed off.
Nail buffer pad, these are model maker gold if you’re going to do these Forge World kits justice.
And without further ado :-
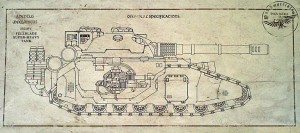
The guy whose article I read had already built himself a Fellblade, and commented on the way he did it, which differs from the instructions Forge World gave out. Which lets be honest, can be very vague at the best of times, its like they’re deliberately trying to re-create the nightmare of 1980’s garage kits.
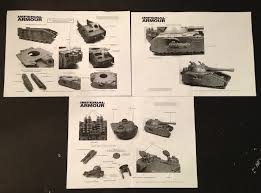
These are a scan of someone else’s but they illustrate the point that these steps are vague at best!
The usual steps of preparation were carried out, the kit was checked for missing parts, then it was soaked in warm water, with some degreaser washing up liquid in, and given a scrub. Simple enough, but this really takes off the release agent and should be an essential part of your modelling routine when dealing with any sort of resin. Once you’ve scrubbed it, give it a rinse in clean water and get it dried off, I like to let mine dry naturally on a towel but you can do whatever, just don’t expose it to the sun, a hair dryer or a radiator, you need to dry this stuff cold, as warmth might bend it. Chances are you’ll need to warm parts of the kit up and bend it anyway, but for the time being, don’t.
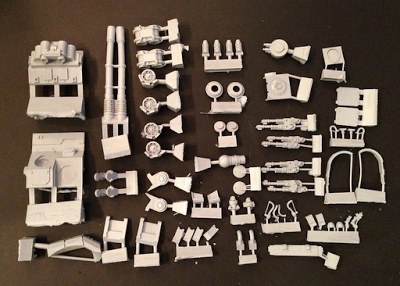
Step one is basically building this thing, and a long step with lots of sub steps is what it is. On paper, this kit is a work of genius, with a plastic Baneblade chassis, that the resin pieces of the Fellblade clip round, creating the large tank you want for your legion. In practice, there’s a bit more to it.
Your base is the two side pieces for the left and right side of the Baneblade chassis, there’s the two floor pieces, and then a front piece made of resin with two tow hooks on. Get the left and right panels stuck together with a bit of plastic cement. If you want to strengthen these bonds, then some flat pieces of plastic or plasticard over the joins will help. Do the same with the floor, making sure its flat, then attach one of the sides to the floor, using the slots at the bottom of each piece. DON’T put the other side on, put the resin tow bar in, then put the other side in, giving you the basis for the whole tank. Like the guys guide I used, I found it useful to put the large top piece just resting on at this point to keep it all square while it dried.
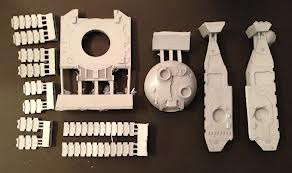
Next you’re putting on the top piece and the front panel with the hole for the demolisher cannon, these need dry fitting a fair few times to make sure they fit. If they don’t fit square, get them under warm water or use a hairdryer. You need a square fit between the rear of the front panel, the front flat piece of the top panel and the front panel to be flush with the tow bar panel from the previous step. Get these all stuck down, and get some bands round it all to keep it steady while it dries. Put the rear engine piece on as well but don’t stick it, just it as a guide to getting the rest square. Once they’re dry, get the engine on. This assembly itself is easy and self explanatory, just put the exhausts into the engine block using the semi circular pegs. You can add the demolisher cannon now, it’s in a ball and socket joint so you can move it, but it moves millimetres, so I’d just stick it down facing forward then put the plate on. Don’t stick the bolters in though, they move, and don’t put the housing on the bolters as you need to undercoat that first so leave both those off the model, but apart from that, the hull is complete, and the easy bit finished.
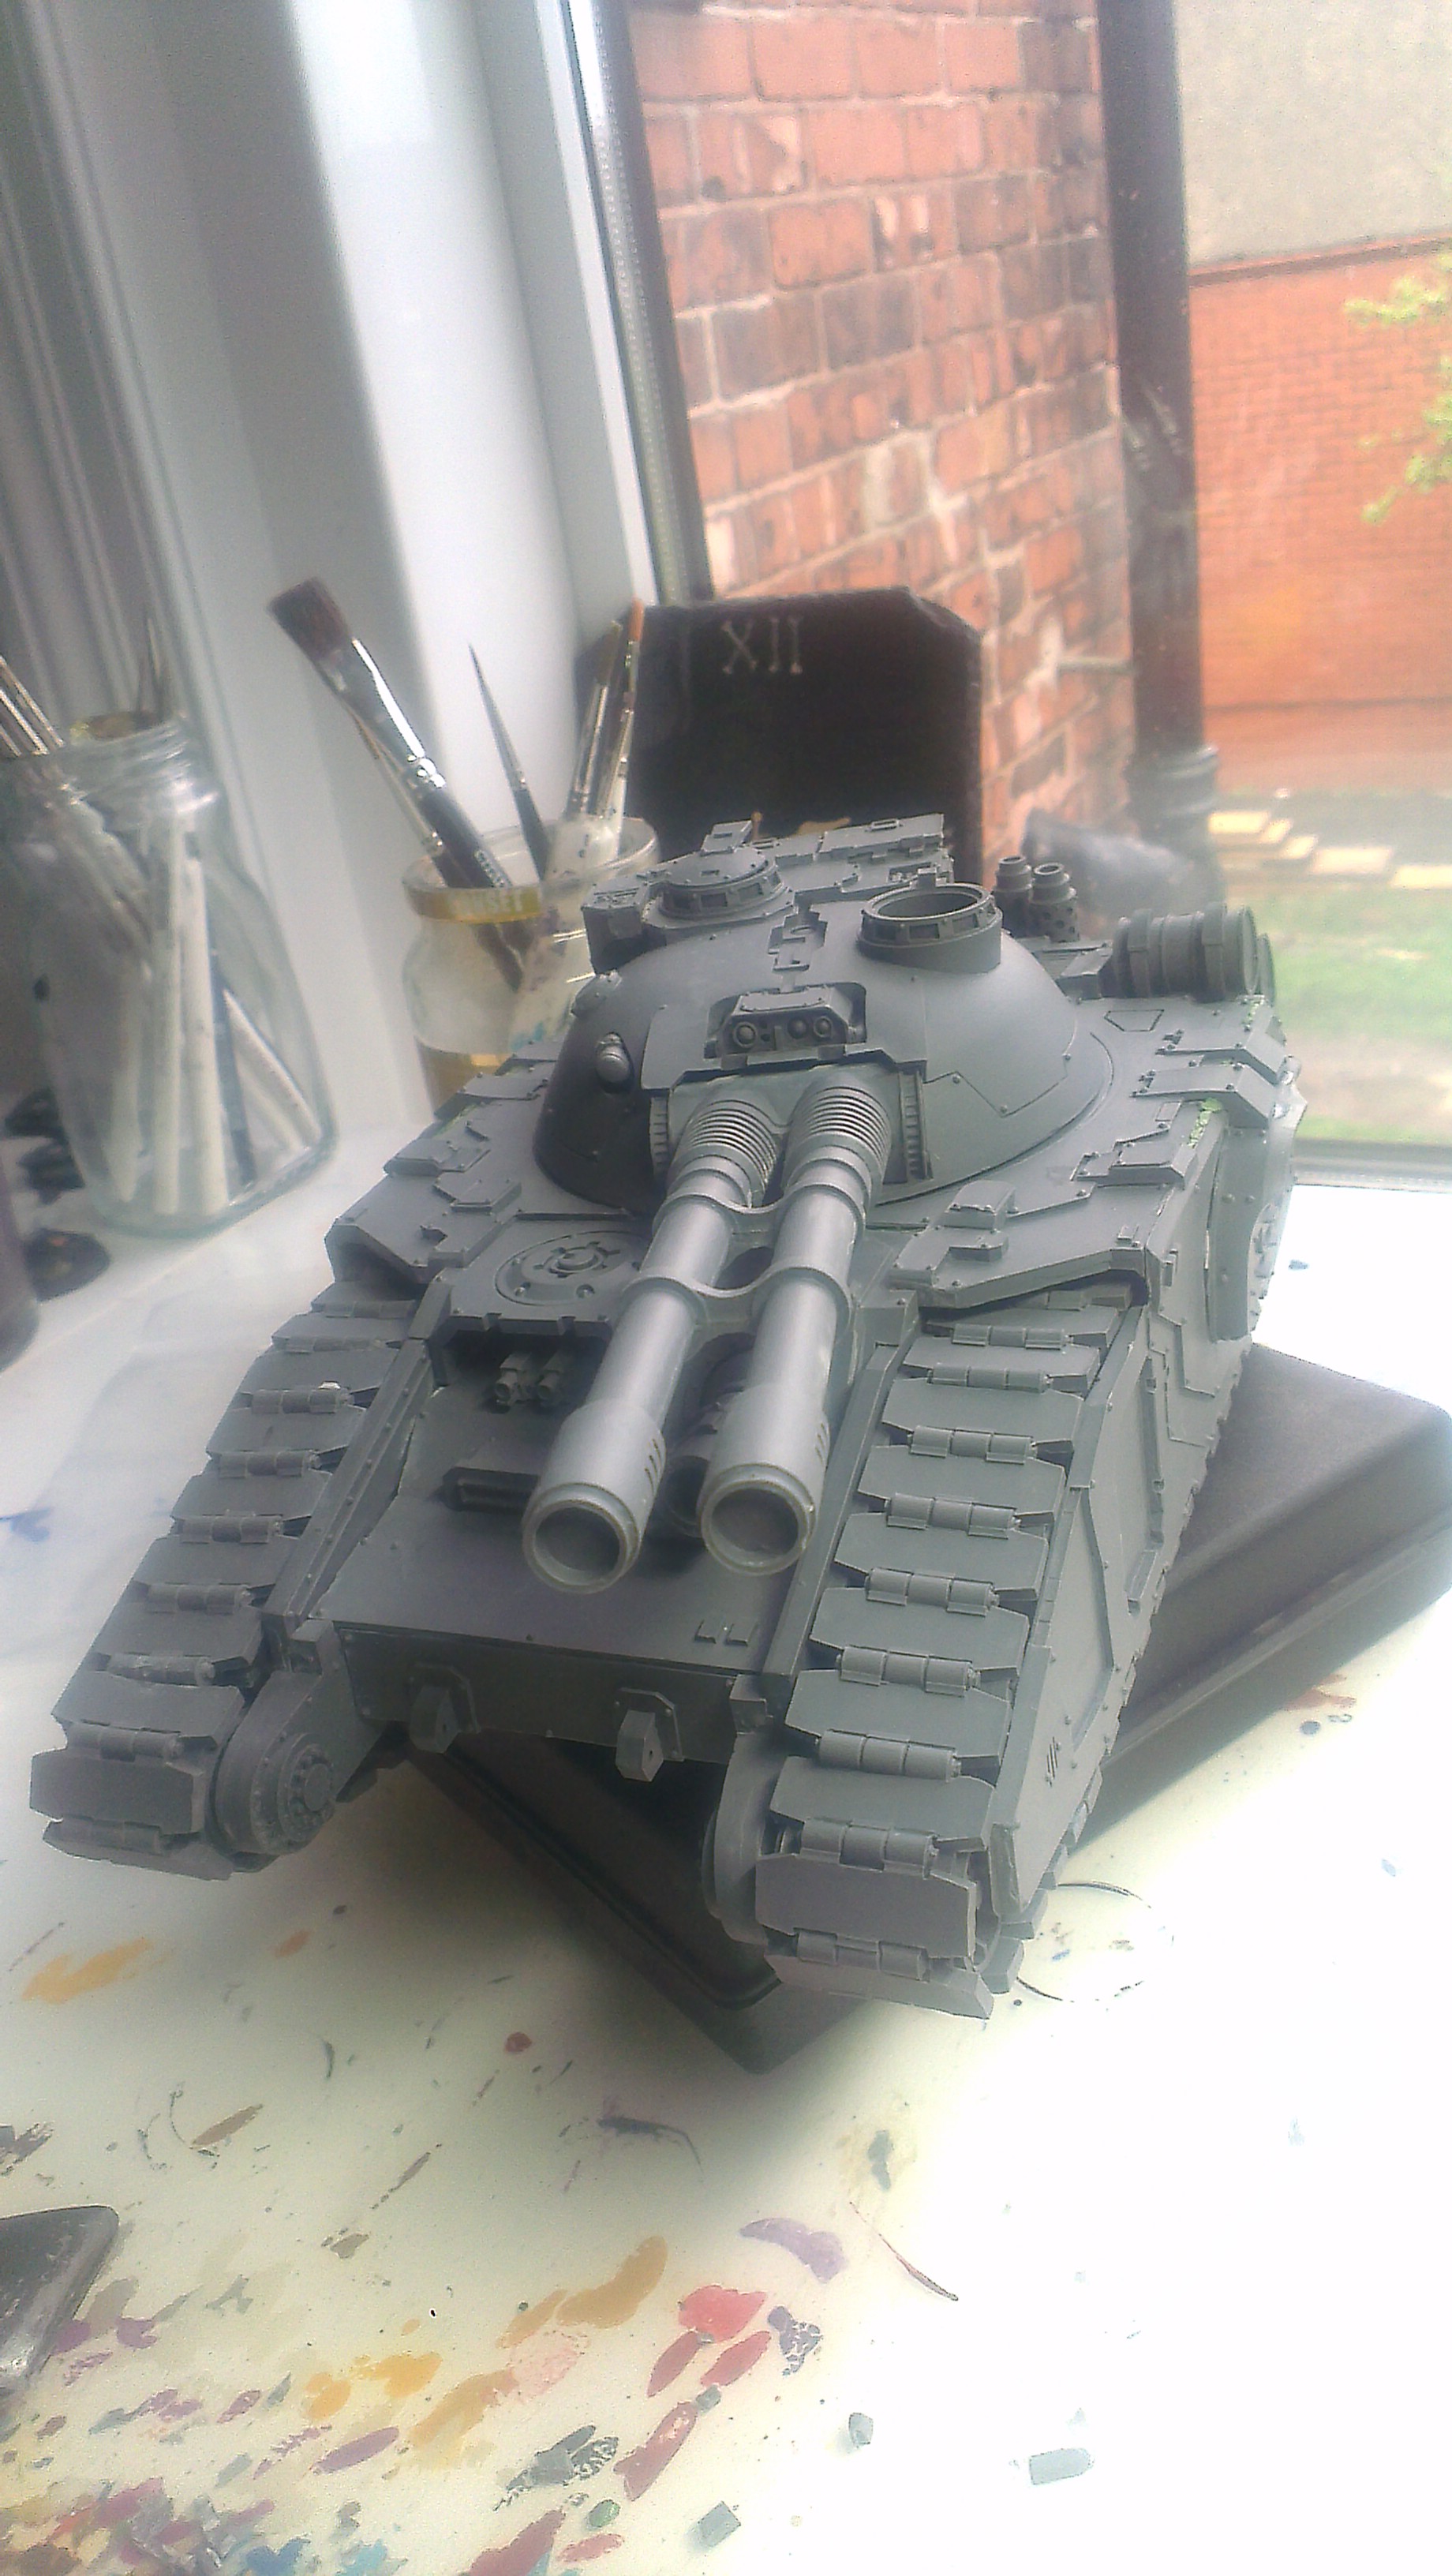
Now the fun begins, the tracks. In theory here, the side panels clip round the pins that stick out from the plastic Baneblade chassis, with the points sitting in the groove that runs down the inside, see it? You need to really check here for any bends in the resin, these are large pieces so take your time and make sure they’re flat where they’re meant to be flat. Dry fit it, mine didn’t fit at all here, the side panels had shrunk slightly in the moulding process so this is the point where the nightmare really began. You’re okay to get the wheel fittings glued in to the bottom of the panels, then you need to get those side panels lined up on the main chassis, you can pin this as they’re large bits, and you might feel happier with some extra support. Essentially the front sloping part of the front panel fits up against those flaps you can see, and the top of it fits flush to the chassis, with the points of the plastic pins slotting down that groove. If yours fits, then excellent, if it doesn’t, get it to fit as well as you can and be prepared to do some green stuff gap filling. You need the sloping front to be straight, or as straight as possible against those flaps, the overhang on the top piece fits to the top of the track panel, or it’s supposed to. Again, do the best you can here and fill the gap between with green stuff, as there WILL be a gap. While you’re doing this, put the rear wheels on, they fit on a kind of axle that’s set out from the back of the hull, put these in now while you’re doing the side panels, as they’re a nightmare to put in if everything is dry. The front ones don’t need to be put on at this stage though, so go let this lot dry.

You can see above the beginnings of the track sections, they are the really tough bit, because for some reason Fellblade tracks can be very fiddly. Check the link I posted at the top of the article, he had the same issue, the track pieces genuinely do not fit the kit as neatly as you’d expect for some reason, so you’re gonna need to do some bodging here. Make sure the wheels on the front axles are on the right way, left and right, then stick the wheel assembly on the front of the hull so they’re straight out and flush, you can pin these too if you like for extra rigidity. Dont stick the actual wheels yet though, as you need to be able to move them slightly when you put on the tracks.
The instructions say begin with the bottom pieces of the track, but really, dry fit everything and start where you feel comfortable as they’re not going to fit snug in any event. This is where I encountered another annoying problem, the inner track wheel assembly was lower than the outer, meaning the tracks were sitting at a 45 degree angle to the hull. I had to cut down those little tabs that fit in to the wheel sockets to get it to look half decent so bear that in mind.
You can get the top tracks on OK, and link them up with the wheel track piece, it’s the bottom ones where things might begin to go wrong. So long as those top ones are straight, then you can get away with the rest to a extent once its painted. Mine looked really bent in grey resin, but with some paint on, the effect is a lot less noticeable. I’m not saying your tank is going to look wonky like mine, I’m just saying that I had a hard time with them, as did the other guy, so it’s clearly a known issue.
If you can keep the bodges to the underside of the tracks, and just fill in a gap or two with plasticard, then you’re laughing as they’ll be dark, metallic, and covered in weathering powders and the like so you’ll never see. The back tracks are also just as much of a pain, dry fit everything plenty of times before you stick it, and try to keep the misalignments to the bottom of the treads. The rest of the kit’s easy, a few clips on the sides, fill the gaps, put the sponson gun shield on, turret’s just three pieces but, given the size and weight of the stowage and the turret, pin them together, as they do fit flush in parts, making this fairly easy.
You can see below the majority of the kit and how the front treads look wonky, I’ll be honest, at this stage I was pretty annoyed with how it had come out, but with some paint, which I’ll cover next time, you don’t notice the angles.
As a final parting shot, I’ll say PAY ATTENTION when assembling the sponsons, I made two left hand ones, it’s easy to do. I then had to cut one apart and re-assemble it as a right side one, so please, at this final step, go slowly even though the end is in sight.
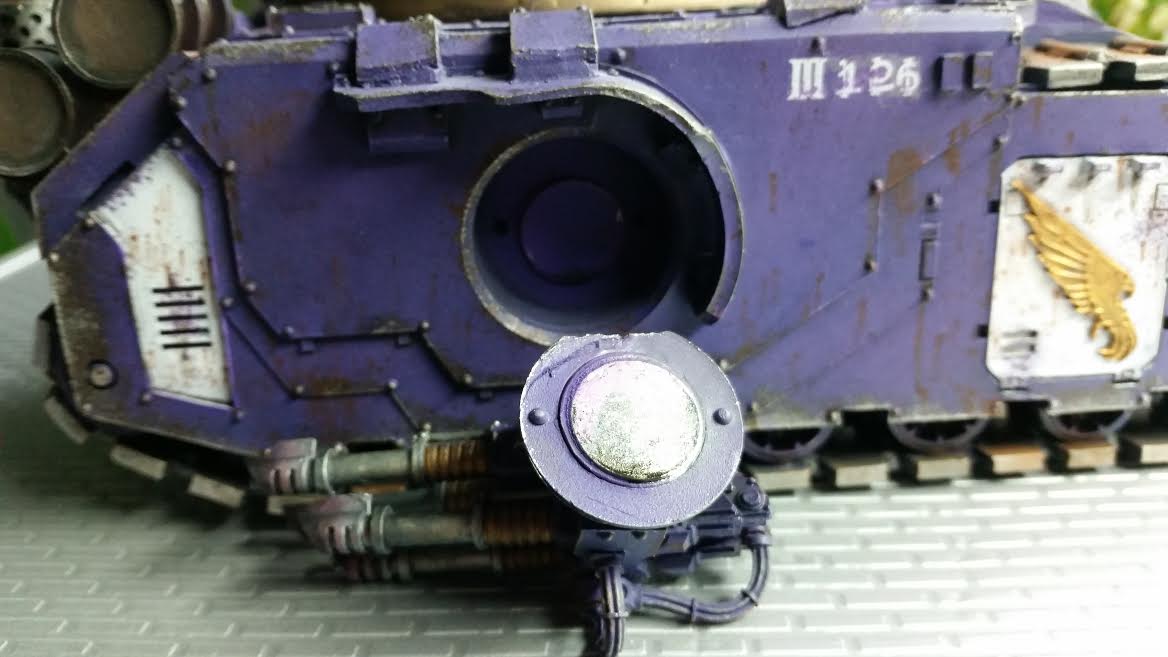
Don’t go gluing them on either as the chances are they’ll get snapped off when you take it out to game with. I used Guys Magnets who are 100% Corehammer approved. Free postage, fast service, excellent range, you cannot go wrong with these guys. You need about a 16mm flat disc magnet, and you’ll need 4 of them. They fit in perfectly to the hull, then the inside of the sponson once you’ve filed off the nubs you’d use if you were gluing it. As you can see in the pic below, they’re the perfect fit and make the model much more transportable.
It’s up to you if you drill out the hatch cover hinges and pin them, you’ll need some really fine wire to hinge them though. Admittedly the vehicle looks better with open hatches and the crew in, but for gaming purposes, I glued mine closed.
And that’s it, your tank is now in 4 sub assemblies, turret, 2 sponsons and the hull ready to paint.
https://www.youtube.com/watch?v=hO874Hft8aE
Wow that’s quite an adventure. Thanks for sharing. One of the reasons I’ve avoided these large tanks is those tracks. They look absolutely miserable. I wish they’d redesign them like the scarians (which have them as part of the side hulls).
I was thinking the same but as its built on the baneblade chassis, i dont know how theyd do it unles those outside wheel fittings were moulted into the side panels. If youre prepared for it mate, I’d recommend taking the plunge, while there are a few issues that might need ironing out, its worth it when its done and painting something on such a large scale is very rewarding. If you do get stuck or whatever there’s a group of us on the facebook page who build stuff like this to help out too.
Strewth. £160 of fun and frolics!
Witch magnets did you use?
Any will so so long as theyre about 13mm x 1mm.
Thanks
Pingback: How to build a Land Raider Spartan Assault Tank | COREHAMMER
Hi Paul – I work for Forge World and I actually sit next to the guy that lays out the instruction leaflets, so I’ll pass your feedback to him on Monday. Drop me a line of you want to talk further.
Cheers, Andy
Ps- I’ve not made a Fellblade but I have made a Falchion, for the Emperors Children too as it happens. I didn’t have any assembly problems as such but I did make the same mistake with the sponson weapons the same way, so maybe the leaflets need a little warning about that 🙂
I’ll drop you a line fella!
Next Project.
New build, Space Marine Fellblade build PC 99590101283.
Video of full build ect, problems and cures.
Video of painting and weathering also.
This will be started 5th April 2016